|
|


TTX (Trailer Train) Equipment
Since I model Santa Fe in the 1990's, I need a lot of intermodal platforms to fill out trains.
Here is a selection of Trailer Train (TTX) intermodal cars I've upgraded and weathered.
Scroll down the page to check them out.
Since I model Santa Fe in the 1990's, I need a lot of intermodal platforms to fill out trains.
Here is a selection of Trailer Train (TTX) intermodal cars I've upgraded and weathered.
Scroll down the page to check them out.
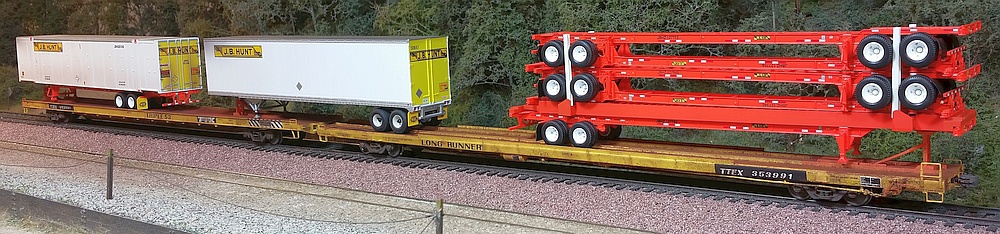
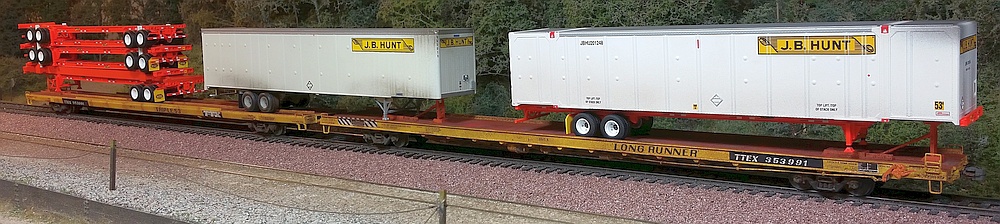
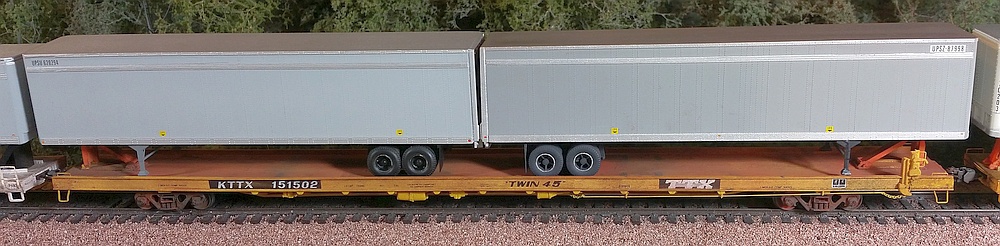
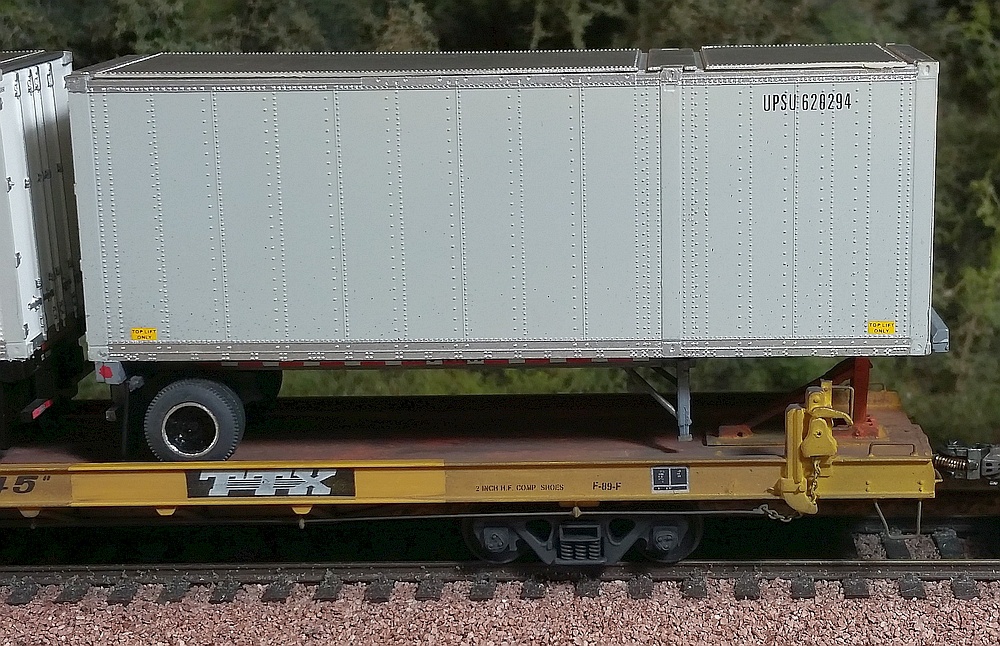
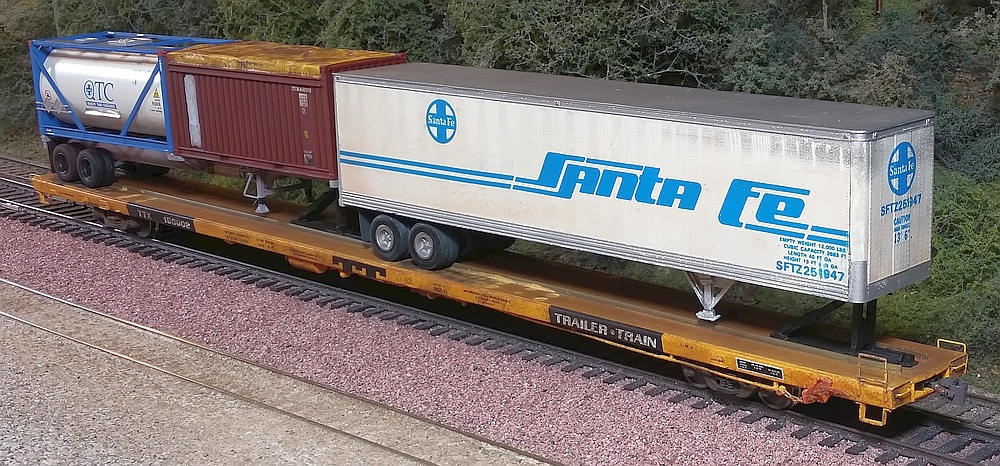
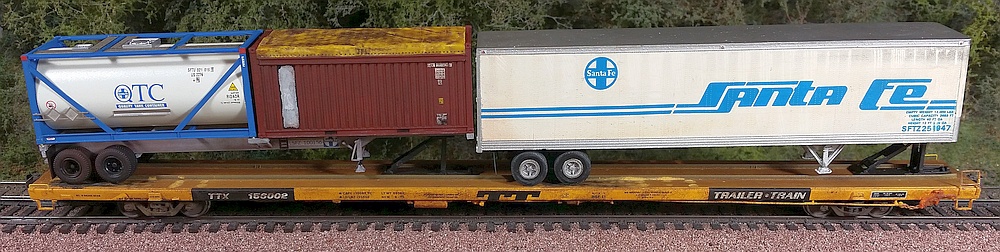
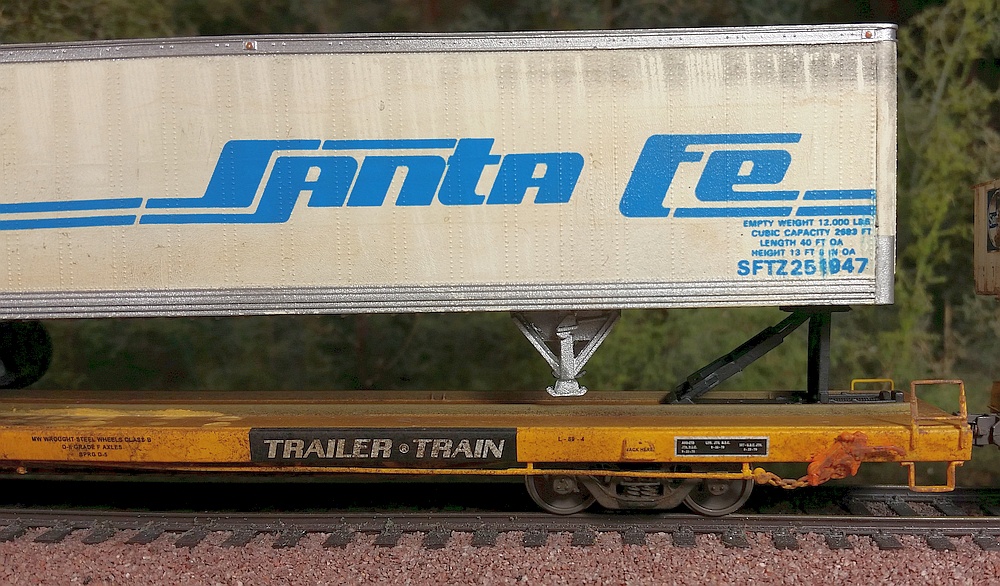
Long Runners are two 89' flat cars permanently linked by a drawbar. TTX built these to carry up to three long trailers (e.g., 48', 53', and 57')
to improve transport efficiency. The center trailer straddles the drawbar joint, giving these a somewhat dicey appearance. Three variants
were created: 1] two channel-side cars mated together, 2] two flush-deck cars mated together, and 3] a flush-deck mated with a channel-side.
I've modeled one of each variant just to cover all the bases. Athearn produced a great model of the double-channel-side,
which I simply weathered. For the other variants I modified, upgraded, painted, and decaled 89' car kits from Walthers.
All are loaded with J.B. Hunt trailers and chassis-mounted containers (also a mix of Athearn and Walthers products).
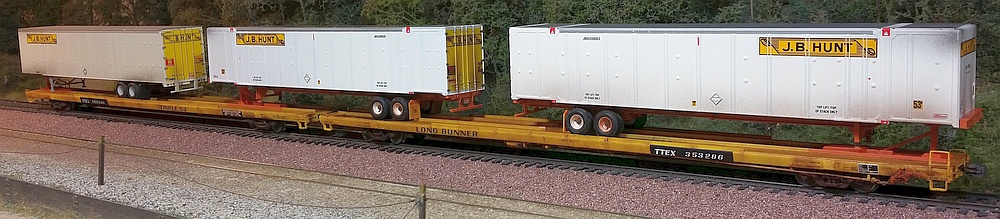
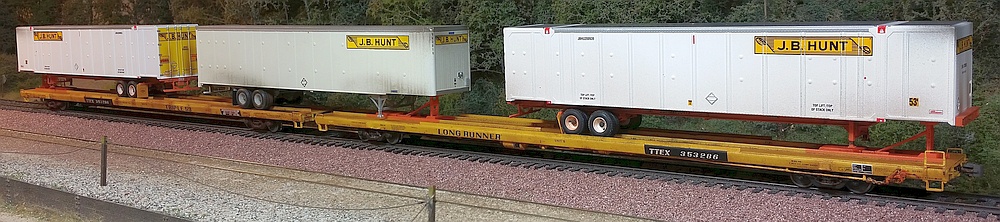
Below: TTEX 353286 is two flush-deck cars, both Walthers products. I added the outside rub rails using strip styrene, including
the tiny triangular braces. The hand brake detail on these cars is fine as-is. More info about the J.B. Hunt equipment is here.
to improve transport efficiency. The center trailer straddles the drawbar joint, giving these a somewhat dicey appearance. Three variants
were created: 1] two channel-side cars mated together, 2] two flush-deck cars mated together, and 3] a flush-deck mated with a channel-side.
I've modeled one of each variant just to cover all the bases. Athearn produced a great model of the double-channel-side,
which I simply weathered. For the other variants I modified, upgraded, painted, and decaled 89' car kits from Walthers.
All are loaded with J.B. Hunt trailers and chassis-mounted containers (also a mix of Athearn and Walthers products).
Below: TTEX 353286 is two flush-deck cars, both Walthers products. I added the outside rub rails using strip styrene, including
the tiny triangular braces. The hand brake detail on these cars is fine as-is. More info about the J.B. Hunt equipment is here.
Below: TTEX 353991 is a flush-deck "A" unit and a channel-side "B" unit, which I find is the most interesting version. Both are Walthers
products. The channel-side is an older kit which conveniently includes a drawbar in the kit parts. On the flush-deck I added the outside
rub rails using strip styrene, including the tiny triangular braces. On the channel-side I reworked the handbrake to a low-profile style.
On both cars I upgraded the grabs and stirrup steps, and placed the correct style hitches. The black/white striped section is a decal
from a Microscale Santa Fe trailer decal set. I also made custom decals for the warning text overlaid on the striping.
More info about the J.B. Hunt equipment is here.
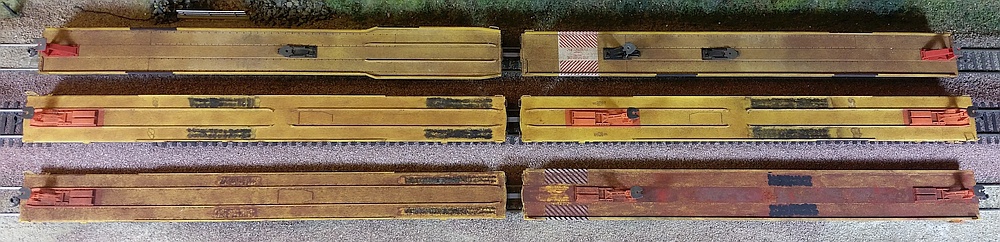
Below: The decks of all three Long Runner models. The top car is Athearn's double-channel-side. Note how the left-hand car's deck flares out.
This is correct for this variant, as TTX had to provide more room for the middle trailer's wheels to slide around as the car negotiated curves.
The center car is my double-flush-deck kitbash. I modified the central rub rails per prototype photos, and added small styrene plates where
the old hitches once stood (the real cars were retrofitted from dual-45 cars that had two hitches on each platform).
The bottom car is my "mixed" platform kitbash. The left-hand flush-deck also has a plated hitch location. The right-hand channel-side has the
black/white striped area, intended to remind rail workers to raise the middle trailer's landing gear so they don't collide with the outer rails of
the channel-side as the car negotiates curves. Note on this variant there was no need to widen the platform, since the middle trailer's wheels
ride on the flush-deck.
I weathered the decks using powdered chalks and art pencils. I just sort of randomly smear around various colors of brown and
reddish-orange to get a grimy, rust grunge effect. A light spray of dull-cote fixes down the chalk. For heavier grunge, I'll repeat this process
two or even three times, building up the chalk.
For the wheel skid marks, I've tried several techniques. For a light mark where just the grunge has been cleaned off to expose the underlying
yellow paint, I'll dab on a small bit of thinner to remove a small patch of the chalk weathering, or I'll literally rub at it with a pencil eraser.
For heavier, dark marks (tire rubber), I'll dab on a spot of dull-cote from a bottle and then stipple black chalk into the wet dull-cote.
Combinations of these techniques can result in more variety of effects.
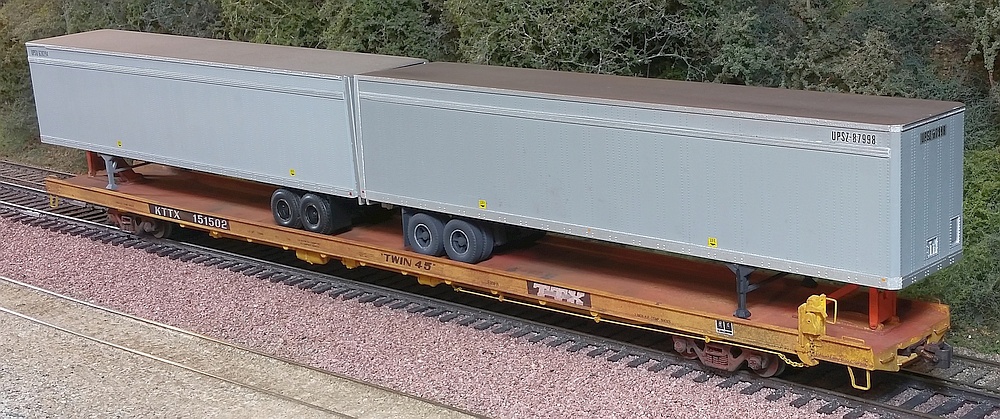
This is a Walthers kit I upgraded with more refined brake stand detail, rigging, and grabs and stirrup steps.
It carries two 45' UPS trailers that I kitbashed - more info here.
It carries two 45' UPS trailers that I kitbashed - more info here.
Below: I added a wire grab to the brake stand, and drilled a hole through the cam to pass a length of
scale chain through. I added wire eyebolts along the underframe and passed a brass wire rod through
them. One end is glued to the chain at the brake stand, while the other end is glued to a short chunk of
chain attached to the brake cylinder. This is a relatively simple upgrade that adds a lot to these cars.
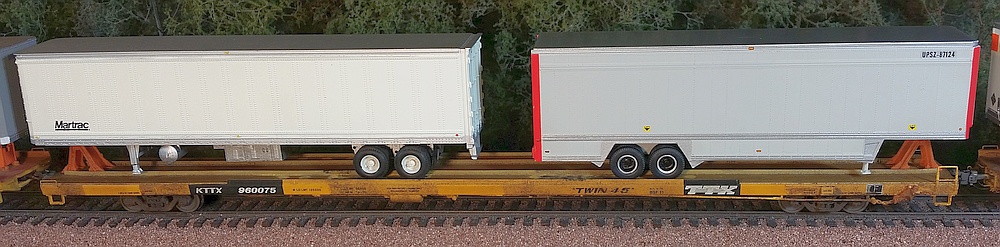
Below: This was one of my first attempts at deck weathering - it's OK when mostly hidden under trailers, but I think my later efforts are better.
This is a Walthers car I upgraded with outer rub rails made from styrene, including the tiny triangular braces.
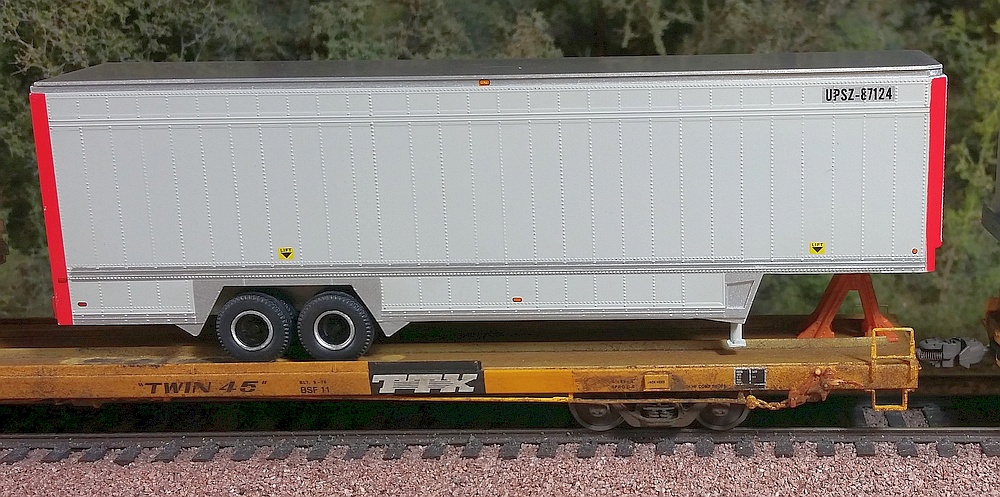
It carries a UPS 40' drop-frame and a 45' Martrac refrigerated trailer - more info here.
It carries a UPS 40' drop-frame and a 45' Martrac refrigerated trailer - more info here.
I decorated this car as if it has been "patch painted" with the newer TTX logo,
covering the old "TT" and "Trailer Train" logos with fresh yellow paint.
I decorated this car as if it has been "patch painted" with the newer TTX and "Triple 28 / Twin 45" logos,
covering the old "TT" and "Trailer Train" logos with fresh yellow paint. Note how the "R" has been added
to the "TTX" reporting mark using a smaller font.
covering the old "TT" and "Trailer Train" logos with fresh yellow paint. Note how the "R" has been added
to the "TTX" reporting mark using a smaller font.
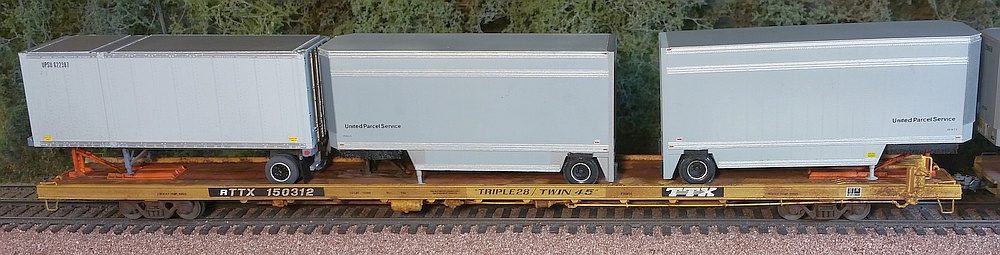
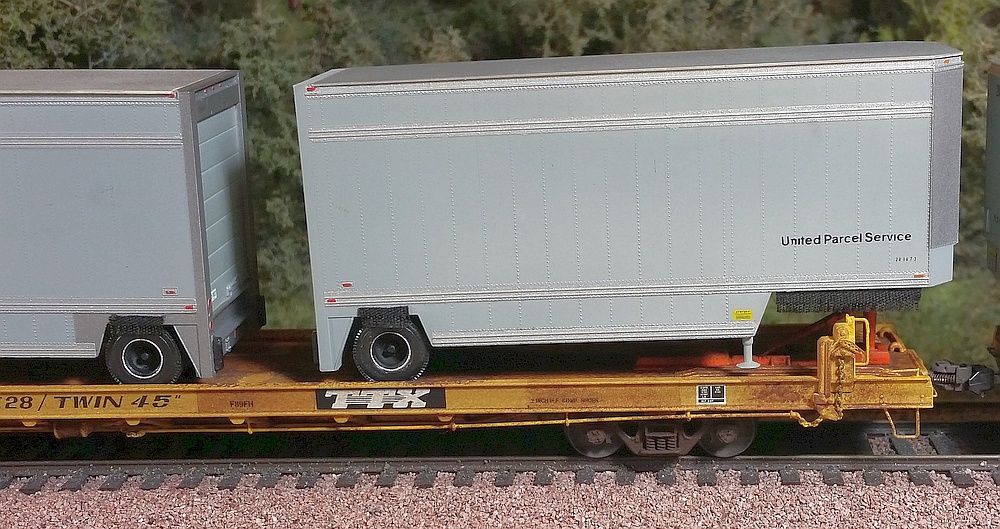
I've made this Walthers kit car appear to have been updated from an older class,
with similar detailing upgrades as KTTX 151502 (see above).
This platform carries UPS 28' equipment (more info here).
with similar detailing upgrades as KTTX 151502 (see above).
This platform carries UPS 28' equipment (more info here).
Below: This deck is heavily weathered to represent an older car that's been in service awhile.
Note how I installed risers at the left end - these are remnants from the days of "circus" style
operations when trucks drove onto the flat cars to pull/push the trailers during loading/unloading.
The risers allowed the trucks to safely pass over folded-down hitches.
Note how I installed risers at the left end - these are remnants from the days of "circus" style
operations when trucks drove onto the flat cars to pull/push the trailers during loading/unloading.
The risers allowed the trucks to safely pass over folded-down hitches.
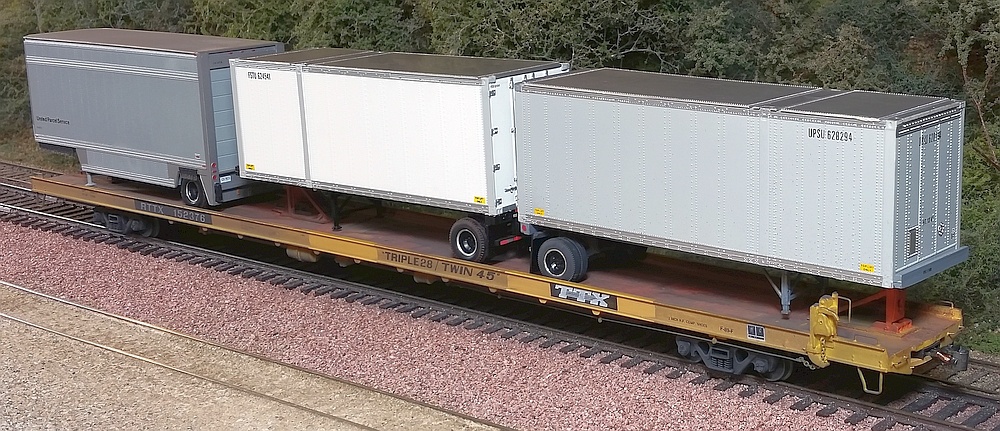
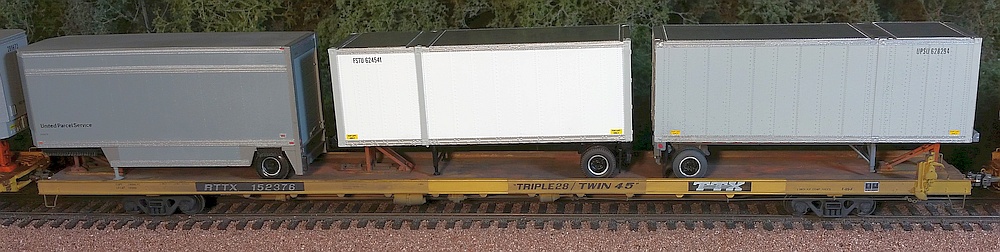
Here's another Walthers kit car also made to appear as updated from an
older class, with similar detailing upgrades as RTTX 150312 (see above).
This platform carries UPS 28' equipment (more info here).
older class, with similar detailing upgrades as RTTX 150312 (see above).
This platform carries UPS 28' equipment (more info here).
Below: I really like how this deck weathering turned out. To get the sharp "plate weld joint lines", I used tape to mask off sections
of the deck, then used the wet dull-cote and chalk stippling method to get patchy, heavy grunge. Once the dull-cote overspray was
dry, I removed the tape to expose a fresh deck area, and covered the weathered area with new tape. Repeating the process,
eventually the entire deck was parceled out into distinct "plates" each with it's own local weathering. I didn't try to make tire rub
spots - the yellow flakey areas have occurred naturally as trailers slightly jiggle around while the car operates over Free-mo layouts.
This is a well-detailed right-out-of-the-box BLMA (now Atlas) model that I re-lettered to
RTTX, added a center hitch, and weathered to match my photos of a prototype car.
RTTX, added a center hitch, and weathered to match my photos of a prototype car.
This upgraded Walthers kit car represents an earlier era before "Trailer Train" became "TTX".
It carries older Santa Fe trailers - more info here. This car still has bridge plates for "circus style" loading.
It carries older Santa Fe trailers - more info here. This car still has bridge plates for "circus style" loading.
To simulate fading paint, I used a grit sprayer to remove some of the Walthers stock paint.
Powdered chalks and dull-cote affixative were then applied for road grunge.
I also upgraded the brake rigging, grabs, and stirrup steps.
I also upgraded the brake rigging, grabs, and stirrup steps.
This is a stock Walthers car that I simply weathered. It also represents an earlier era
before "TTX", and it carries Santa Fe trailers circa the mid-1980's - more info here.
before "TTX", and it carries Santa Fe trailers circa the mid-1980's - more info here.
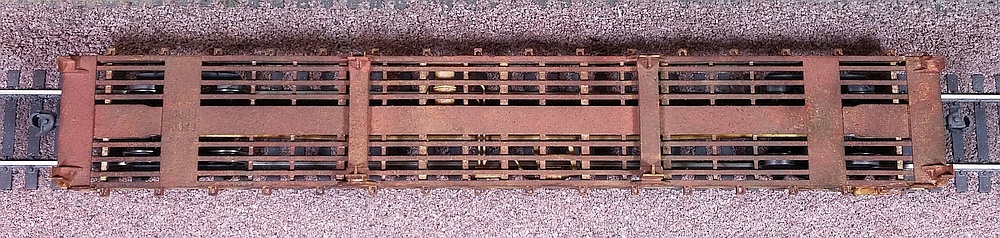
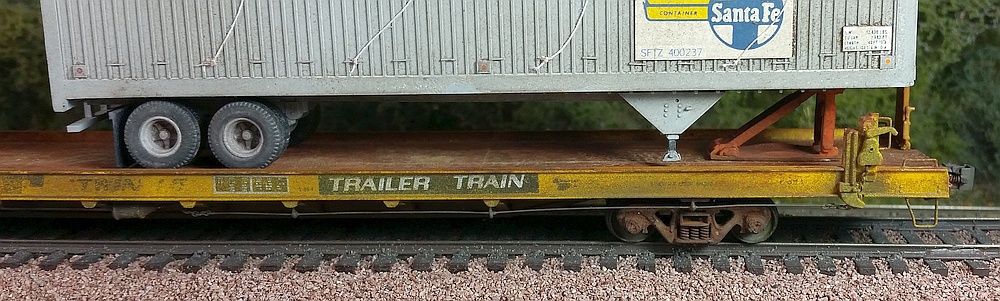
Let me share a "dirty little secret" with you - I don't fully weather the underframes of my cars. As seen below, I just do the sides of the centersill
and the visible portions of the brake rigging. I don't bother with the bottom of the deck or centersill, since those areas cannot be seen when
viewing a car from the side or from above. I figure why waste time and weathering materials on areas that no one will ever see?
Also, a note about trucks - I remove the wheels and clamp down the pivot screw, leaving the truck frames mounted to the car during weathering.
I usually wet them down with dull-cote and stipple on a blend of darker weathering chalks (black, dark gray, dark brown), with perhaps a tiny
touch of darker rust. The chalk is over-sprayed with dull-cote at the same time as the rest of the car's weathering.
I then replace the wheels and brush-paint them with Roof Brown or a similar grungy color. Occasionally while the Roof Brown is still damp I'll
stipple on some light orange chalk to represent a rusting wheel, though I don't do this much as it's easily overdone and can be distracting when
watching a train roll by. It's realistic to occasionally see a rusty wheel, but not on every third car, for example.
Oh, and couplers - I use standard Kadee #5's on these long cars, because the oversized knuckles forgive more up/down motion that avoids
uncoupling problems over hill-and-dale track (unless the track is really bad - in that case, the track should be fixed, not the cars!). I always snip
off the uncoupling trip pins as I don't like how they look. I also carefully brush-paint the couplers with Roof Brown or a similar grungy color.
Long Runner TOFCs
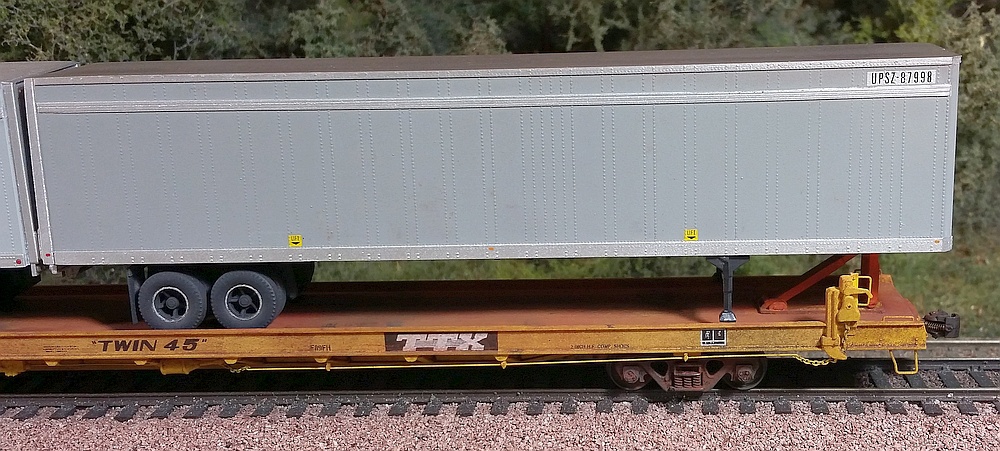
KTTX 151502 TOFC
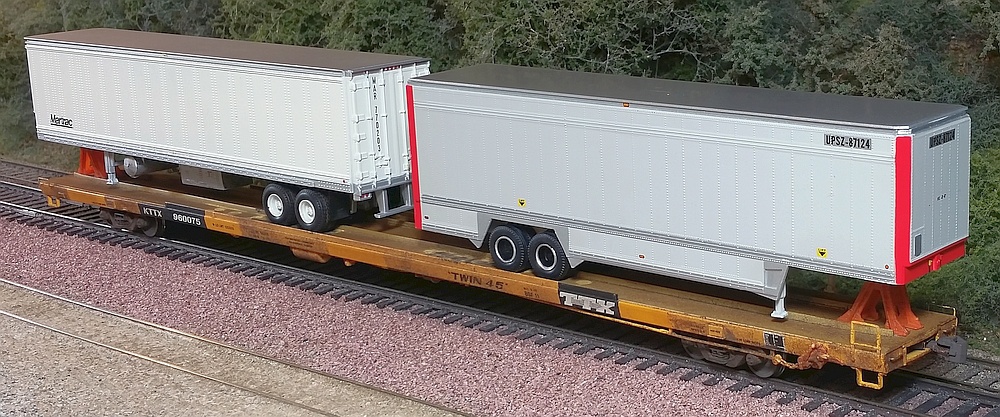
KTTX 960075 TOFC
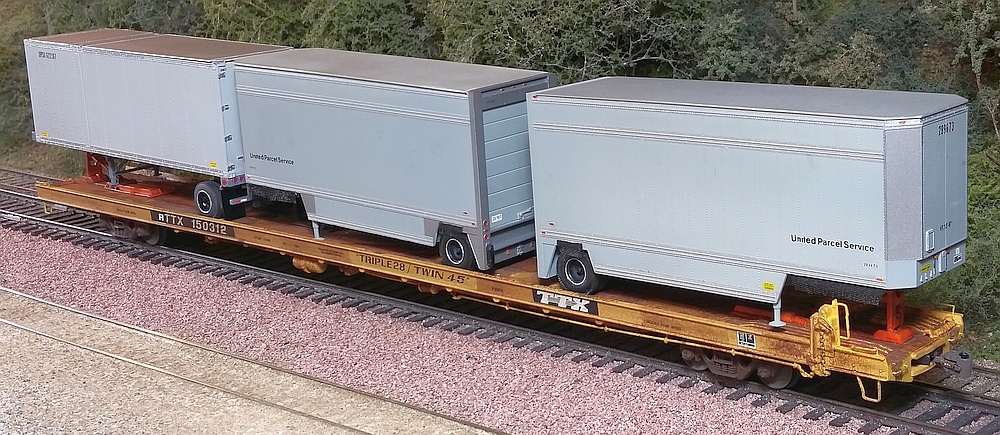
RTTX 150312 TOFC
RTTX 152376 TOFC
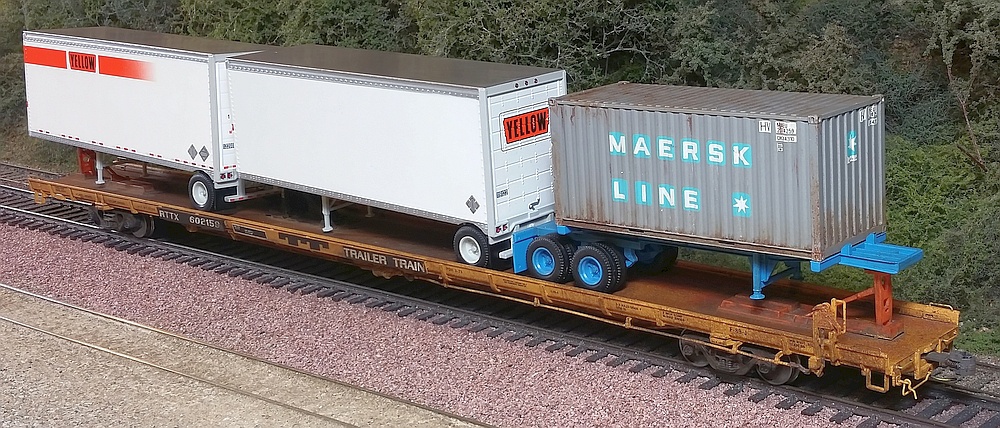
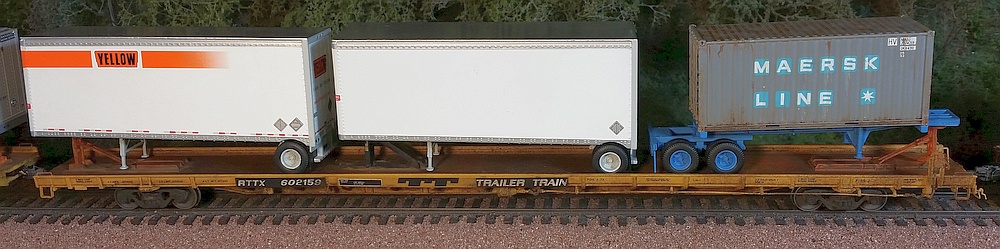
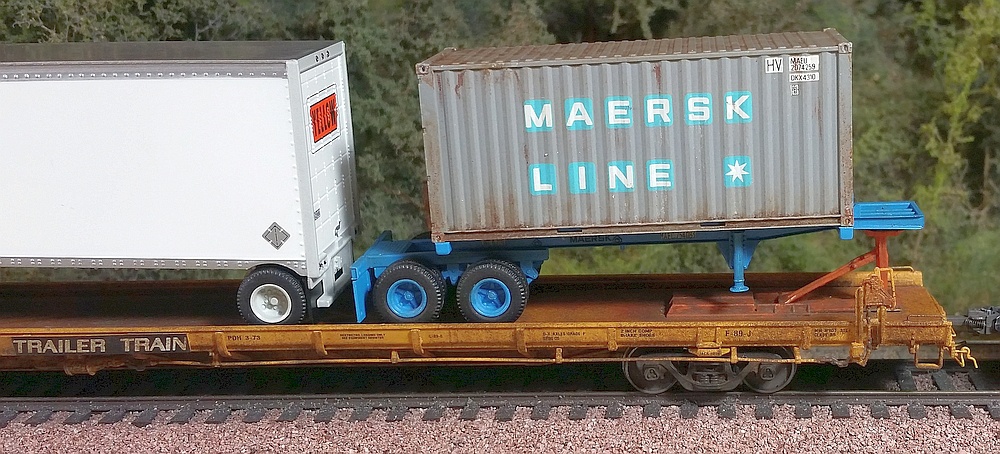
RTTX 602159 TOFC
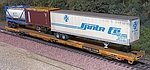
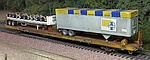
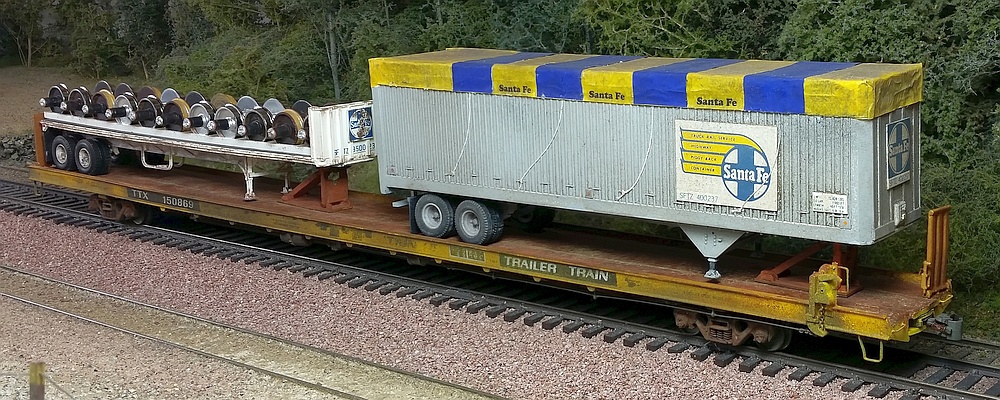
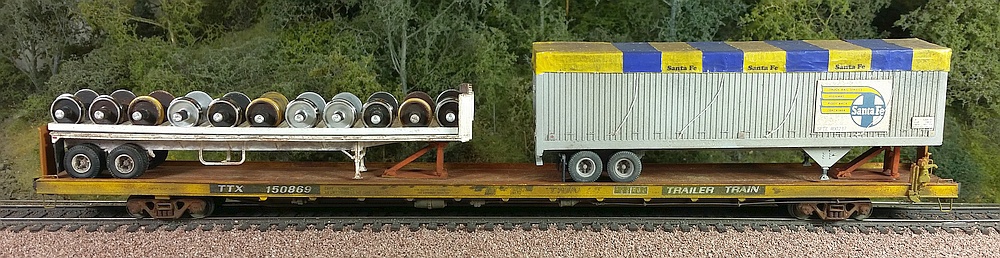
TTX 150869 TOFC
TTX 156002 TOFC
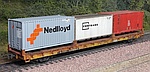
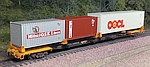
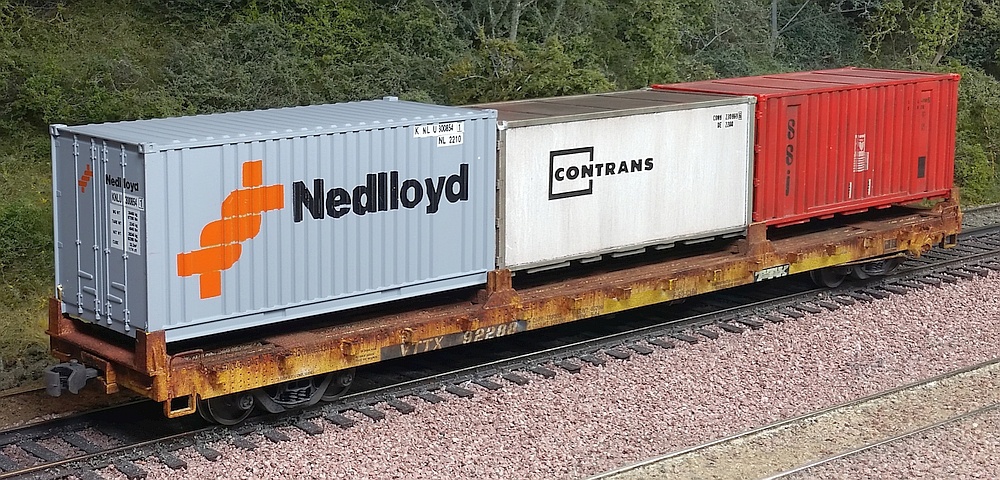
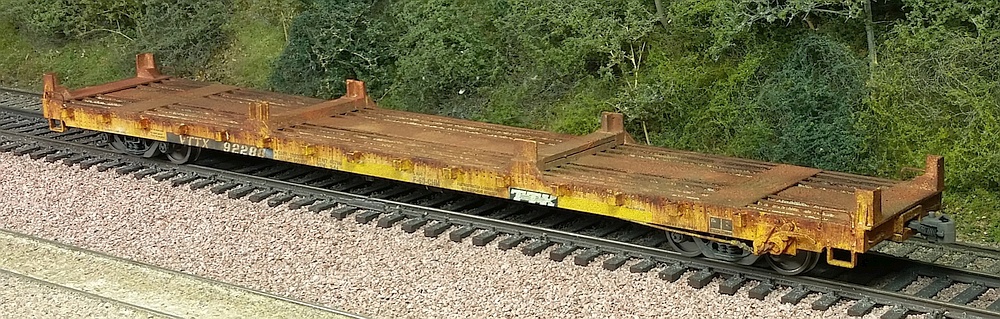
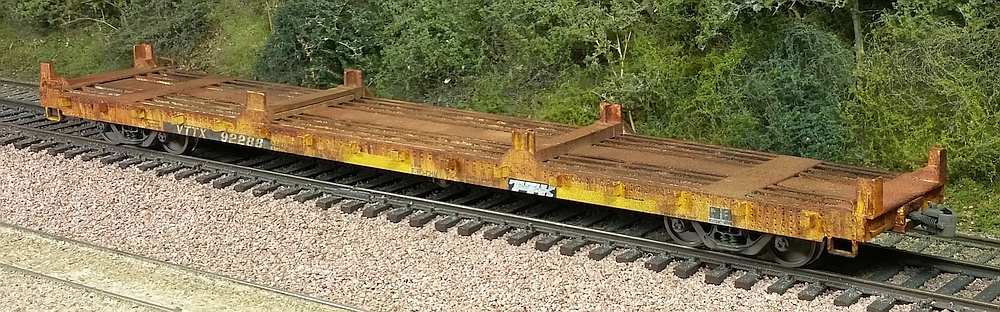
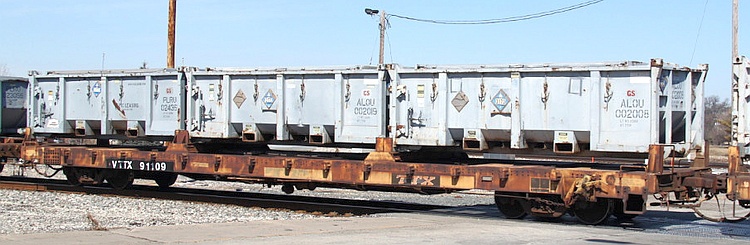
VTTX 92288 COFC
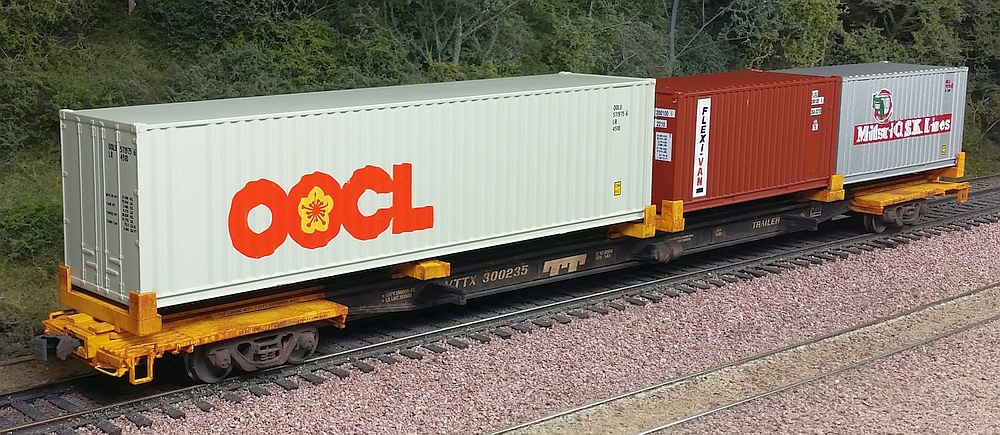
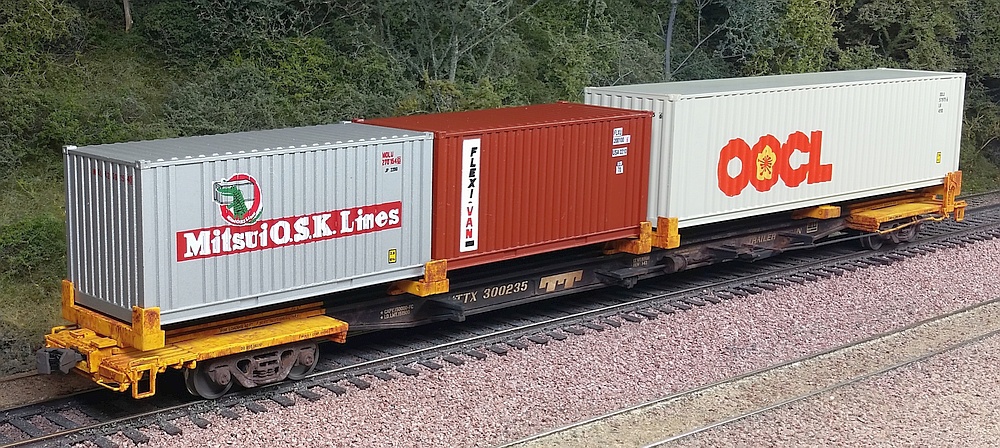
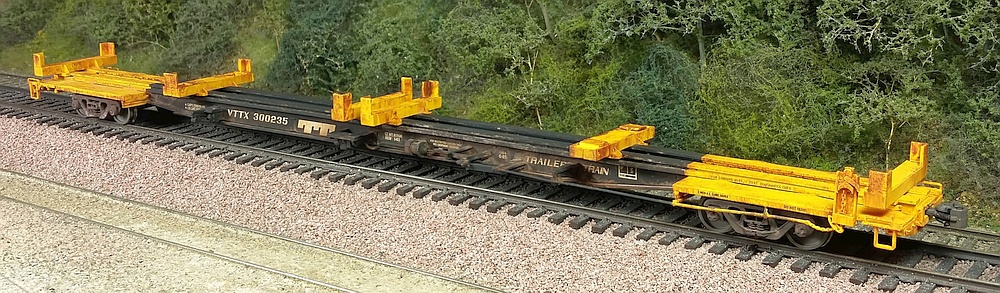
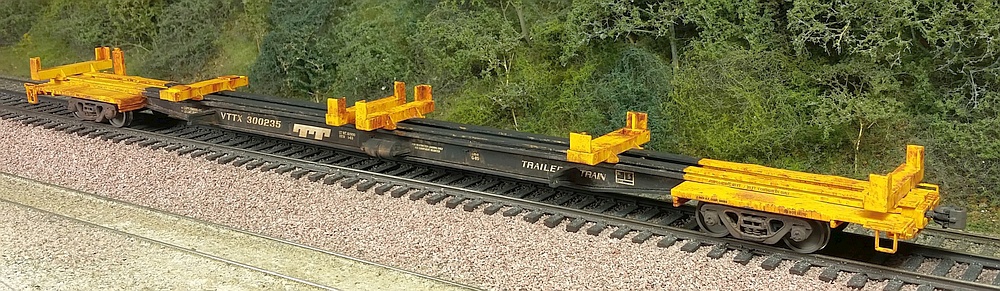
VTTX 300235 COFC
This is a Walthers ready-to-run car. I replaced a few cast-on grabs with metal wire grabs, and weathered it heavily per prototype photos.
The streaked rust is artist's oil paints, and the "dry rust" is chalks stippled into wet dull-cote. Before weathering, I masked some side sill
areas to represent re-painted patches covering the old "TT" and "Trailer Train" logos.
The streaked rust is artist's oil paints, and the "dry rust" is chalks stippled into wet dull-cote. Before weathering, I masked some side sill
areas to represent re-painted patches covering the old "TT" and "Trailer Train" logos.
This is a Walthers ready-to-run car. I replaced a few cast-on grabs with metal wire grabs, and weathered it per prototype photos.
The streaked rust is artist's oil paints, and the "road dust" is chalks. A spray of dull-cote holds it all on securely.
The streaked rust is artist's oil paints, and the "road dust" is chalks. A spray of dull-cote holds it all on securely.
Originally I had erroneously setup the hitches on this car like a KTTX, with one hitch at each end. When this mistake was
pointed out to me, I repositioned the hitches correctly for a TTX car, added the bridge plates, and took the opportunity to
re-weather the deck. I first removed as much of the old weathering as I could, then spray-painted the deck brown. I then used
painter's tape to partition the deck into sections representing steel plates. I then stippled various chalks onto the deck - brown,
rust, orange, etc. - one section at a time, hitting it with dull-cote and letting it dry. I then repositioned the tape to expose a new
section and repeated the process until all sections were weathered. This ensures a hard line between sections, preserving the
illusion of separate steel plates. The last step was to rub some yellow chalk into the rusty grunge along the edges and down
the middle to represent the last vestiges of the original deck paint. A final light dull-cote spray holds everything in place.
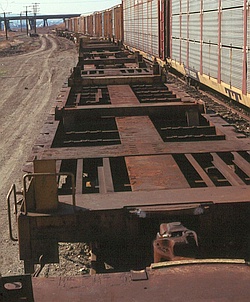
Below and Right: Prototype photos show that, for whatever reason, these cars are "rust collectors", sort of
the Pig-Pens of the intermodal world. I based my model on these images and others found on the internet.
the Pig-Pens of the intermodal world. I based my model on these images and others found on the internet.
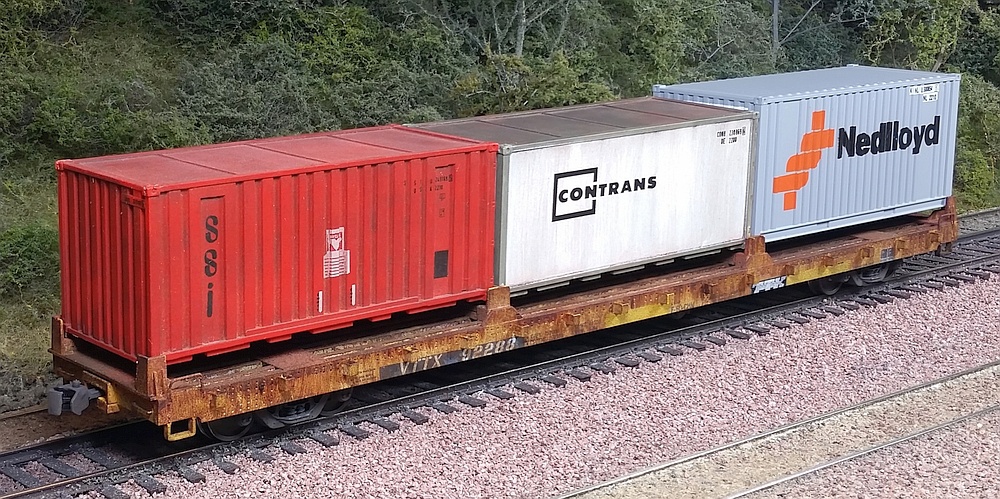
Below: My model with assorted 20' containers loaded. On the Walthers model, one of the
middle supports is removable so the car can carry one 40' and one 20' container instead.
middle supports is removable so the car can carry one 40' and one 20' container instead.
Right: This prototype photo shows
what I was trying to replicate
with my weathering efforts.
what I was trying to replicate
with my weathering efforts.
Below: My model with a mix of 40' and 20' containers loaded. On the Walthers model, the
middle supports can be raised or lowered to accomodate different container configurations.
middle supports can be raised or lowered to accomodate different container configurations.