|
|


Olympic-style Recurve Archery
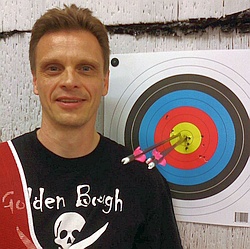
I did this specific style of archery from 2010 to 2017 including tournaments, leagues, and 'fun shoots'.
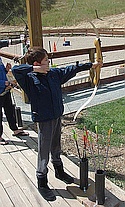
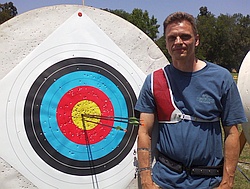
My son Eric was also involved the first few years (right), so we learned the sport together. Archery
was fun because it combines technicality (all the science behind the equipment), mental acuity
(keeping your head in the game, but not too much), and physical challenge (pulling 40 pounds over
and over while holding aim on a tiny dot up to 70 meters away). And practice. Lots and lots of practice.
I don't have many photos of myself shooting a bow, so apologies for the so-so images here.
To learn more: Olympic Recurve Archery
I did this specific style of archery from 2010 to 2017 including tournaments, leagues, and 'fun shoots'.
My son Eric was also involved the first few years (right), so we learned the sport together. Archery
was fun because it combines technicality (all the science behind the equipment), mental acuity
(keeping your head in the game, but not too much), and physical challenge (pulling 40 pounds over
and over while holding aim on a tiny dot up to 70 meters away). And practice. Lots and lots of practice.
I don't have many photos of myself shooting a bow, so apologies for the so-so images here.
To learn more: Olympic Recurve Archery
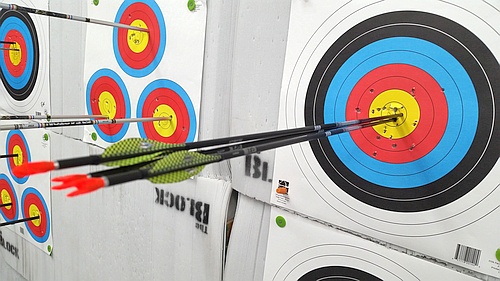
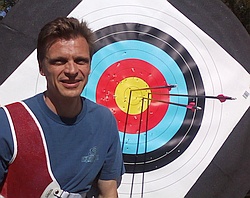
Left and Below: The best 'end' I ever got - all three arrows in the
coveted 'X' ring! An 'end' is a set of arrows, typically between 3 and 6,
shot together. Several 'ends' are shot to complete a 'round'. For
example, a '300 round' might consist of 10 ends of 3 arrows, each
having the potential to score 10 points. In archery, an arrow touching
a line is scored for the higher valued (inner) ring. This is a FITA style
40 cm target with 10 rings and 5 colors. The inner yellow ring is worth
10 points (as is the centermost 'X' ring), and the outmost white ring
is worth 1 point. At competitions when two archers tie in score, the
number of X's they got are counted up to break the tie. It's called the
'X' ring because it has a small cross at the exact center.
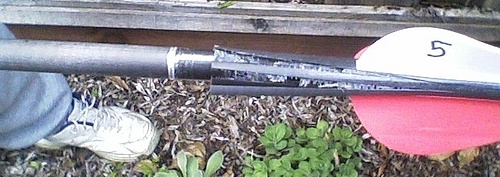
An arrow slamming into another one already in the target is called a
'Robin Hood', and is surprisingly common once an archer gets any
good. Though it might seem 'cool', trust me - with the cost of
high-performance arrows, you do not want to get a Robin Hood!
Below: This is my first Robin Hood (dumb luck) when I first started
archery using cheap beginner's arrows. Obviously the victim arrow
number 5 was never shot again! Using nock pins usually prevents
such damage, as they deflect the incoming arrow to one side so it
doesn't 'telescope' into the victim arrow and destroy it.
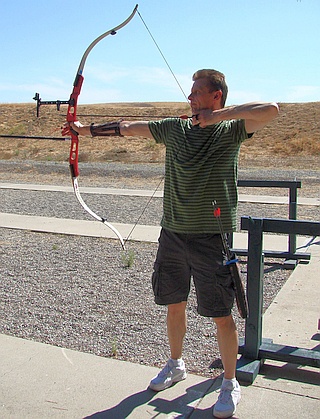
Right: Here I am
shooting my beginner's
bow around 2012. This
is a PSE brand Optima
with a Cartel main
stabilizer and Shibuya
sight.
shooting my beginner's
bow around 2012. This
is a PSE brand Optima
with a Cartel main
stabilizer and Shibuya
sight.
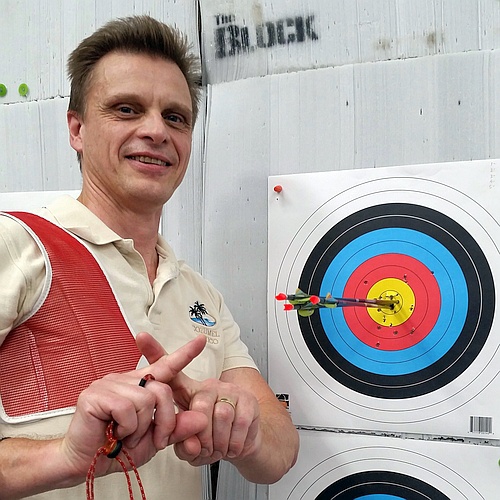
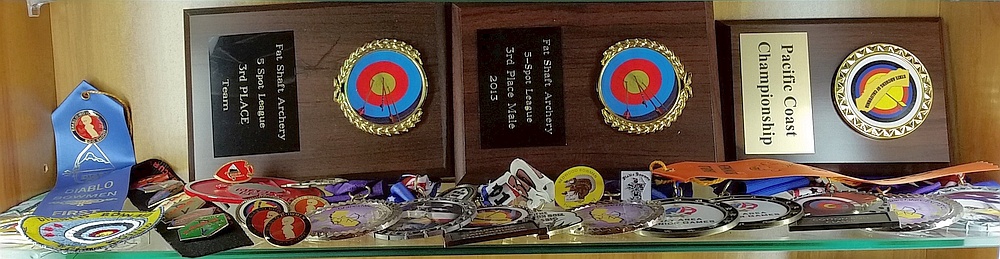
Below: A collection of archery awards and memorabilia I accumulated from assorted events.
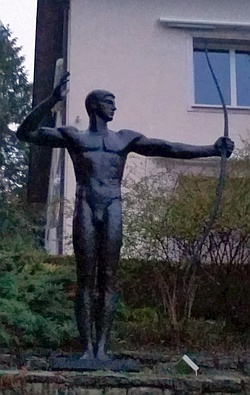
Right: Archery is an Olympic sport.
This statue represents archery at
the Olympic museum in Lausanne,
Switzerland, which I visited in 2018.
This statue represents archery at
the Olympic museum in Lausanne,
Switzerland, which I visited in 2018.
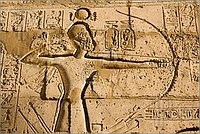
Below: Archery has existed for
many thousands of years, well
before the ancient Egyptians
immortalized this archer in stone.
many thousands of years, well
before the ancient Egyptians
immortalized this archer in stone.
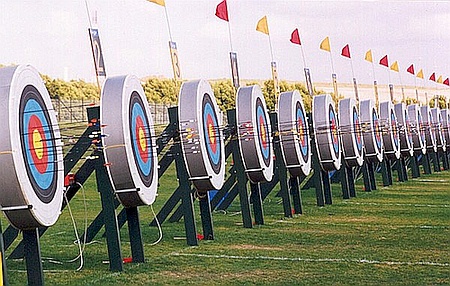
Above: A typical target line at a tournament.
The flags help the archers see how the wind is blowing so they can compensate. The numbers
let the archers know which target to aim at.
The flags help the archers see how the wind is blowing so they can compensate. The numbers
let the archers know which target to aim at.
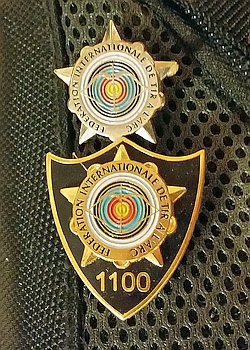
Right: At the state level of competition, the
outdoor tournaments are usually 1440-point
"Star FITA" events. This means you can
earn a cool pin if you score 1000+ points,
like my silver star pin here, or an even nicer
pin for 1100+ points, like my gold shield pin
here. There are also pins for 1200+ and
1300+ points. The highest FITA score
I achieved was 1170.
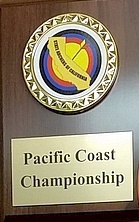
Right: My 1170 score was also
the best tournament finish I
achieved - a first place in the
Masters 50+ Recurve category,
shooting against 5 other guys,
at the 2014 Pacific Coast State
Championship in Sacramento CA.
the best tournament finish I
achieved - a first place in the
Masters 50+ Recurve category,
shooting against 5 other guys,
at the 2014 Pacific Coast State
Championship in Sacramento CA.
Below: I kept a chart of my "best" scores
for different types of tournaments and at different shooting distances.
for different types of tournaments and at different shooting distances.
A decent grouping at 50 meters,
Pacific Coast Championship,
September 2013
Pacific Coast Championship,
September 2013
An X-X-10 at 20 yards,
Fat Shafts Archery indoor league,
Halloween 2013
Fat Shafts Archery indoor league,
Halloween 2013
An X-10-10 at 30 meters,
Grape Stakes tournament,
June 2015
Grape Stakes tournament,
June 2015
An X-X-X-X-5 at 20 yards
on a NFA 5-ring target.
Fat Shafts Archery indoor league,
March 2016
on a NFA 5-ring target.
Fat Shafts Archery indoor league,
March 2016
I was using this equipment
as of 2017. Most of these
items, or current equivalents,
are available through
Lancaster Archery Supply:
Bow string: 60X Custom Strings,
67.25" long, 8125G material,
red and black, silver servings
Limbs: Hoyt,
720 Carbon Grand Prix (ILF), long
Vibration absorbers: Sims,
Ultra recurve limbsavers
Riser: Hoyt,
GMX (Gold Medalist Xtreme),
Grand Prix (ILF), 25", red fusion,
replacement cherrywood grip
Sight: Shibuya,
Ultima RC Recurve carbon,
Sight aperature: Cartel, square
Clicker: Cartel,
magnetic, mounted to sight bar
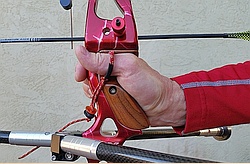
Plunger button: Shibuya, DX
Arrow rest: Shibuya, Ultima
V-bar: Shibuya, Ultima
Main stabilizer: Doinker,
Avancee 30" long
Side stabilizers: Doinker,
Avancee 12" long
Add-on weights: Doinker,
Dawg weights, stainless steel
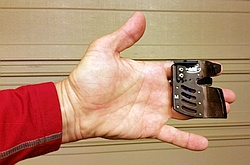
Finger tab: AAE,
Elite, KSL adjustable finger spacer
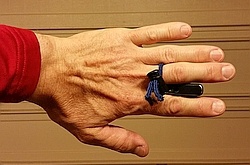
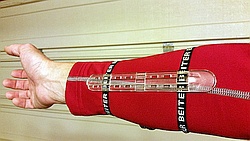
Arm guard: Beiter, translucent
Finger sling: Win & Win, adjustable
Chest protector: Cartel
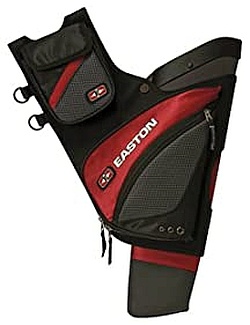
Quiver: Easton, QH100
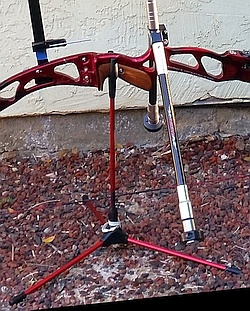
Bow stand: Win & Win Axiom
Bow case: Pelican, 1700,
blank foam with custom cutouts
as of 2017. Most of these
items, or current equivalents,
are available through
Lancaster Archery Supply:
Bow string: 60X Custom Strings,
67.25" long, 8125G material,
red and black, silver servings
Limbs: Hoyt,
720 Carbon Grand Prix (ILF), long
Vibration absorbers: Sims,
Ultra recurve limbsavers
Riser: Hoyt,
GMX (Gold Medalist Xtreme),
Grand Prix (ILF), 25", red fusion,
replacement cherrywood grip
Sight: Shibuya,
Ultima RC Recurve carbon,
Sight aperature: Cartel, square
Clicker: Cartel,
magnetic, mounted to sight bar
Plunger button: Shibuya, DX
Arrow rest: Shibuya, Ultima
V-bar: Shibuya, Ultima
Main stabilizer: Doinker,
Avancee 30" long
Side stabilizers: Doinker,
Avancee 12" long
Add-on weights: Doinker,
Dawg weights, stainless steel
Finger tab: AAE,
Elite, KSL adjustable finger spacer
Arm guard: Beiter, translucent
Finger sling: Win & Win, adjustable
Chest protector: Cartel
Quiver: Easton, QH100
Bow stand: Win & Win Axiom
Bow case: Pelican, 1700,
blank foam with custom cutouts
Arrow spine: The "spine" rating of the arrow shaft is a measure of its flexibility. When shot, an arrow actually bends as it leaves the bow due
to its own inertia (especially the heavy point at the front end) and the sudden force of the released string pushing on the back end of the arrow.
The arrow spine must be matched to the force being applied to it during release. A too-stiff or too-flexible arrow will either shoot left or right
instead of down the center as desired. Arrow manufacturers provide spine charts to help archers choose the correct spine value based on their
draw weight (see limb weight, below) and draw length (which determines the arrow length - see below).
Arrow balance: The spot along the arrow where it balances, in effect the center of gravity of the arrow, affects how it flies through the air.
This parameter is mostly controlled by the mass of the arrow point at the front end, but the nock and vanes at the back end can also affect this.
Arrow point: The metal pointy end of the arrow is available in various masses, shapes, and attachment method. Glue-in points fit into the shaft
directly and are semi-permanently attached. Screw-in points thread into a threaded receiver (which is itself glued into the shaft) and therefore
can be easily changed to help tune the arrow (see arrow balance, above), or replaced in case of damage.
Arrow length: This parameter is determined by the archer's draw length (see below). A longer arrow will flex more than a shorter arrow of the
same spine rating, so the archer must know their draw length to choose the correct arrow shaft. A too-short arrow will fall off the arrow rest
at the end of the draw. A too-long arrow will weigh more and therefore not fly as far for a given draw weight (see limb weight, below), and
also will cause issues when using a riser-mounted clicker.
Draw length: This is how far back the archer pulls (draws) the arrow before releasing the shot. It is entirely based on the physical aspects of the
archer (e.g., an archer with shorter arms will have a shorter draw length). This parameter determines the arrow length, which interacts with the
archer's draw weight (see limb weight, below) to determine the correct arrow spine (see above).
Limb weight: This is not how much the bow's limbs physically weigh. Rather it is a measure of how much force the limbs, via the released
string, will impart on the arrow. This parameter is typically in "pounds" and is standardized at a draw length of 28 inches. Imagine pointing the
bow straight up at the sky, and then hanging weights on the string until the draw length is at 28 inches. The amount of weight at that point is the
"limb weight" rating.
But ... think of the limbs like springs - the more you compress a spring, the more stored energy it has, and the more force it will provide when
released. This is true with bow limbs too. Let's say the limbs have a rating of 34 pounds at 28" draw length - if the archer's actual draw length is
less than 28", the limbs will provide less than 34 pounds of force because the limbs will not get flexed as far during the draw. And if the archer's
draw length is more than 28", the limbs will provide more than 34 pounds of force because they are being flexed further during the draw. As an
example, I was using 34 pound limbs, but I was actually shooting at 37 pounds because I have a draw length of 29.5 inches. This archer-specific
"draw weight", along with the arrow length (determined by the archer's draw length, above), is used to select the arrow spine.
Choosing a limb weight is a balancing act of the archer's strength and endurance, versus the maximum distance the shots need to fly. The
arrow's total weight also comes into play here - a lighter arrow will fly further, so the archer can reduce limb weight to reach a particular distance.
However, lighter arrows are affected more by cross-winds for outdoor shooting, reducing accuracy. So as an archer builds up strength and
endurance, they can benefit by going up in limb weight so they can use a heavier, more accurate arrow to reach the desired distance. Also,
since higher limb weight puts more force into the arrow, it will leave the bow faster allowing the arrow to follow a flatter trajectory and reach the
target faster. This is desirable for outdoor shooting because it reduces the time any cross-winds have to affect the arrow's path, resulting in
better overall accuracy at longer distances.
Bow string: The length of the bow string must be correct for the specific bow size, which is determined by the riser length plus the limb length.
An incorrect string length, both too short or too long, will reduce how much force the limbs can deliver and will cause issues with setting the
correct brace height (see below). The string material is also important. Different materials have different masses, affecting how "fast" the
string release snaps the arrow forward. Also, the amount of stretch in the string needs to be minimized to ensure a consistent force from
shot to shot and over the life of the string. The string does wear out, as the repetitive forces imparted on it slowly break down the material.
Nocking point: Typically, a small brass ring is crimped onto the string, and the archer sets the arrow's nock against this nocking point to ensure
a consistent arrow starting position for every shot. The location of this nocking point on the string relative to the arrow rest (on the riser)
determines the vertical angle at which the arrow starts its journey. This starting angle affects how the arrow flies through the air. a vertical
wobble in flight is called "porpoising" and reduces accuracy, causing the arrow to hit the target either above or below the center.
Brace height: This is the distance from the resting string to the riser. It is adjusted by adding or removing twists to the string, which shortens or
lengthens the string respectively, which in turn moves the limb tips together or apart, respectively. As the limb tips move together, the brace
height will increase (string gets further from riser), and vice-versa. A correct brace height is important to get the best efficiency from the bow.
The wrong brace height can rob the bow of its potential "power", since it affects where the limbs stop during the shot. It also affects the timing
of when the arrow releases from the string, which can impact how the arrow is oriented as it begins its journey to the target.
Tiller: This is a comparison of the two limbs' resting positions relative to the riser. A tiller of "zero" means both limbs are equi-distant from the
riser. Some archers set the tiller to something other than "zero" to compensate for the asymmetrical nature of pulling the string back - the two
limbs might not be equally flexed, and adjusting tiller can compensate for this to equalize the flex in the limbs, which optimizes bow performance.
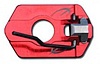
Arrow rest: Advanced arrow rests (the thingy on the bow riser that holds the arrow shaft before release) have adjustable height and depth. The
height is set to ensure the arrow shaft is centered vertically against the plunger button (see below). The rest depth is set based on the arrow's
shaft diameter, such that the tip of the rest extends just slightly out from the edge of the shaft. Incorrect settings here can cause problems as
the arrow leaves the bow, such as falling off the rest too early or the arrow vanes striking the rest as they pass by.
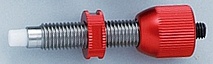
Plunger depth: The plunger, often called a "button", is a spring-loaded device mounted on the riser just above the arrow rest. It presses against
the arrow shaft as it bends during the release. The plunger provides a counter-force to this bending action, reducing the arrow bend which helps
it fly more efficiently through the air (reduced flexation oscillation :-). The plunger depth is set as part of the "center-shot" - the arrow sitting on its
rest is actually not perfectly aligned with the path to the target. Rather, it's set at a very slight side-to-side angle, and the plunger depth is what
determines that angle. This arrow angle compensates for the side-ways forces imparted on the nock end by the archer's fingers as the string is
released, which is an asymmetrical process.
Plunger tension: This parameter is the amount of counter-force provided by the plunger against the arrow shaft during release. The plunger's
internal spring force is adjusted by turning a dial on the plunger which sets the amount of pre-compression in the spring. This setting affects
center-shot (whether the arrow's trajectory is in alignment with the bow) and also how well the arrow flies in the horizontal plane. Too much arrow
oscillation side-to-side is called "fishtailing" and reduces accuracy, causing the arrow to hit the target either left or right of the center.
Stabilizers and weights: Stabilizers are the long rod extending forward from the riser and the shorter rods extending to the sides. These rods
have weights at the ends, which add inertia to the bow and help reduce tipping and rotating in all three dimensions. Think of the bow as a
platform for launching the arrow - the more stable the platform at launch time, the more predictable and consistent the arrow's path will be.
One goal of setting up the stabilizer system is balance - the rod lengths and weight values are configured such that the bow is balanced where
the archer's bow hand presses into the grip of the riser, or just in front of that point. There is another trade-off here - more weight usually means
more stability, but too much weight can make the bow overly heavy, causing the archer's bow arm to tire easily.
to its own inertia (especially the heavy point at the front end) and the sudden force of the released string pushing on the back end of the arrow.
The arrow spine must be matched to the force being applied to it during release. A too-stiff or too-flexible arrow will either shoot left or right
instead of down the center as desired. Arrow manufacturers provide spine charts to help archers choose the correct spine value based on their
draw weight (see limb weight, below) and draw length (which determines the arrow length - see below).
Arrow balance: The spot along the arrow where it balances, in effect the center of gravity of the arrow, affects how it flies through the air.
This parameter is mostly controlled by the mass of the arrow point at the front end, but the nock and vanes at the back end can also affect this.
Arrow point: The metal pointy end of the arrow is available in various masses, shapes, and attachment method. Glue-in points fit into the shaft
directly and are semi-permanently attached. Screw-in points thread into a threaded receiver (which is itself glued into the shaft) and therefore
can be easily changed to help tune the arrow (see arrow balance, above), or replaced in case of damage.
Arrow length: This parameter is determined by the archer's draw length (see below). A longer arrow will flex more than a shorter arrow of the
same spine rating, so the archer must know their draw length to choose the correct arrow shaft. A too-short arrow will fall off the arrow rest
at the end of the draw. A too-long arrow will weigh more and therefore not fly as far for a given draw weight (see limb weight, below), and
also will cause issues when using a riser-mounted clicker.
Draw length: This is how far back the archer pulls (draws) the arrow before releasing the shot. It is entirely based on the physical aspects of the
archer (e.g., an archer with shorter arms will have a shorter draw length). This parameter determines the arrow length, which interacts with the
archer's draw weight (see limb weight, below) to determine the correct arrow spine (see above).
Limb weight: This is not how much the bow's limbs physically weigh. Rather it is a measure of how much force the limbs, via the released
string, will impart on the arrow. This parameter is typically in "pounds" and is standardized at a draw length of 28 inches. Imagine pointing the
bow straight up at the sky, and then hanging weights on the string until the draw length is at 28 inches. The amount of weight at that point is the
"limb weight" rating.
But ... think of the limbs like springs - the more you compress a spring, the more stored energy it has, and the more force it will provide when
released. This is true with bow limbs too. Let's say the limbs have a rating of 34 pounds at 28" draw length - if the archer's actual draw length is
less than 28", the limbs will provide less than 34 pounds of force because the limbs will not get flexed as far during the draw. And if the archer's
draw length is more than 28", the limbs will provide more than 34 pounds of force because they are being flexed further during the draw. As an
example, I was using 34 pound limbs, but I was actually shooting at 37 pounds because I have a draw length of 29.5 inches. This archer-specific
"draw weight", along with the arrow length (determined by the archer's draw length, above), is used to select the arrow spine.
Choosing a limb weight is a balancing act of the archer's strength and endurance, versus the maximum distance the shots need to fly. The
arrow's total weight also comes into play here - a lighter arrow will fly further, so the archer can reduce limb weight to reach a particular distance.
However, lighter arrows are affected more by cross-winds for outdoor shooting, reducing accuracy. So as an archer builds up strength and
endurance, they can benefit by going up in limb weight so they can use a heavier, more accurate arrow to reach the desired distance. Also,
since higher limb weight puts more force into the arrow, it will leave the bow faster allowing the arrow to follow a flatter trajectory and reach the
target faster. This is desirable for outdoor shooting because it reduces the time any cross-winds have to affect the arrow's path, resulting in
better overall accuracy at longer distances.
Bow string: The length of the bow string must be correct for the specific bow size, which is determined by the riser length plus the limb length.
An incorrect string length, both too short or too long, will reduce how much force the limbs can deliver and will cause issues with setting the
correct brace height (see below). The string material is also important. Different materials have different masses, affecting how "fast" the
string release snaps the arrow forward. Also, the amount of stretch in the string needs to be minimized to ensure a consistent force from
shot to shot and over the life of the string. The string does wear out, as the repetitive forces imparted on it slowly break down the material.
Nocking point: Typically, a small brass ring is crimped onto the string, and the archer sets the arrow's nock against this nocking point to ensure
a consistent arrow starting position for every shot. The location of this nocking point on the string relative to the arrow rest (on the riser)
determines the vertical angle at which the arrow starts its journey. This starting angle affects how the arrow flies through the air. a vertical
wobble in flight is called "porpoising" and reduces accuracy, causing the arrow to hit the target either above or below the center.
Brace height: This is the distance from the resting string to the riser. It is adjusted by adding or removing twists to the string, which shortens or
lengthens the string respectively, which in turn moves the limb tips together or apart, respectively. As the limb tips move together, the brace
height will increase (string gets further from riser), and vice-versa. A correct brace height is important to get the best efficiency from the bow.
The wrong brace height can rob the bow of its potential "power", since it affects where the limbs stop during the shot. It also affects the timing
of when the arrow releases from the string, which can impact how the arrow is oriented as it begins its journey to the target.
Tiller: This is a comparison of the two limbs' resting positions relative to the riser. A tiller of "zero" means both limbs are equi-distant from the
riser. Some archers set the tiller to something other than "zero" to compensate for the asymmetrical nature of pulling the string back - the two
limbs might not be equally flexed, and adjusting tiller can compensate for this to equalize the flex in the limbs, which optimizes bow performance.
Arrow rest: Advanced arrow rests (the thingy on the bow riser that holds the arrow shaft before release) have adjustable height and depth. The
height is set to ensure the arrow shaft is centered vertically against the plunger button (see below). The rest depth is set based on the arrow's
shaft diameter, such that the tip of the rest extends just slightly out from the edge of the shaft. Incorrect settings here can cause problems as
the arrow leaves the bow, such as falling off the rest too early or the arrow vanes striking the rest as they pass by.
Plunger depth: The plunger, often called a "button", is a spring-loaded device mounted on the riser just above the arrow rest. It presses against
the arrow shaft as it bends during the release. The plunger provides a counter-force to this bending action, reducing the arrow bend which helps
it fly more efficiently through the air (reduced flexation oscillation :-). The plunger depth is set as part of the "center-shot" - the arrow sitting on its
rest is actually not perfectly aligned with the path to the target. Rather, it's set at a very slight side-to-side angle, and the plunger depth is what
determines that angle. This arrow angle compensates for the side-ways forces imparted on the nock end by the archer's fingers as the string is
released, which is an asymmetrical process.
Plunger tension: This parameter is the amount of counter-force provided by the plunger against the arrow shaft during release. The plunger's
internal spring force is adjusted by turning a dial on the plunger which sets the amount of pre-compression in the spring. This setting affects
center-shot (whether the arrow's trajectory is in alignment with the bow) and also how well the arrow flies in the horizontal plane. Too much arrow
oscillation side-to-side is called "fishtailing" and reduces accuracy, causing the arrow to hit the target either left or right of the center.
Stabilizers and weights: Stabilizers are the long rod extending forward from the riser and the shorter rods extending to the sides. These rods
have weights at the ends, which add inertia to the bow and help reduce tipping and rotating in all three dimensions. Think of the bow as a
platform for launching the arrow - the more stable the platform at launch time, the more predictable and consistent the arrow's path will be.
One goal of setting up the stabilizer system is balance - the rod lengths and weight values are configured such that the bow is balanced where
the archer's bow hand presses into the grip of the riser, or just in front of that point. There is another trade-off here - more weight usually means
more stability, but too much weight can make the bow overly heavy, causing the archer's bow arm to tire easily.
Below: Some good 'ends' shot at various archery events.
Arrows:
Shafts: Easton, type A/C/E (aluminum / carbon-fiber), 620 spine, 29" long
Points: TopHat, SL stainless steel convex bullet-shape, glue-in
Nock pins: Easton, ACE nock pins, glue-in
Nocks: Beiter, #2 pin nocks, Flo Red
Vanes: Gas Pro, 2.5" target efficient, medium height, left-handed spin, Flo Yellow
Vane tape: Spin Wing, 3M tape strips double-side adhesive
Vane lining: Kurly Vane, black lining tape strips
In archery the bow, arrows, and archer all work together like the parts of a well-oiled machine. So the equipment must be
"tuned" to perform well - the bow and the arrows must be matched to the archer's unique body and shooting technique.
Tuning is an empirical process, requiring patience and consistent shooting technique. I found several tuning guides on
the internet, some more helpful than others. These guides seem to come and go, so I'll refrain from adding links to them
here. I don't profess to be an expert at recurve tuning, but here I share what I learned during my few years in archery.
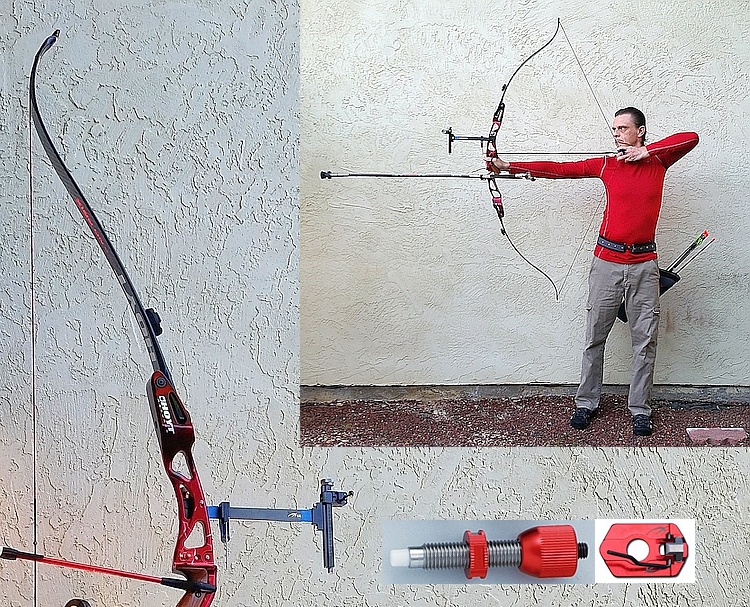
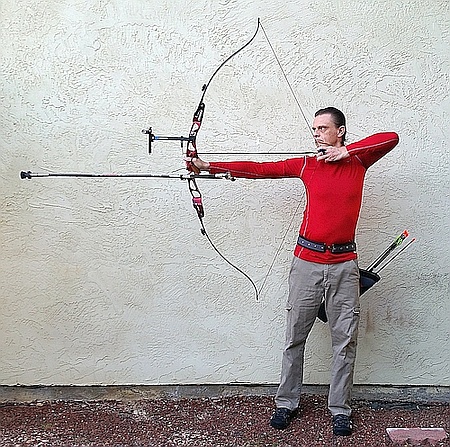
Here I am at full draw, just
to demonstrate my specific
shooting form. Ideally that
back elbow should be in line
with the arrow, but I have
overly long arms so the
"extra" arm length
results in a high
drawing elbow.
to demonstrate my specific
shooting form. Ideally that
back elbow should be in line
with the arrow, but I have
overly long arms so the
"extra" arm length
results in a high
drawing elbow.
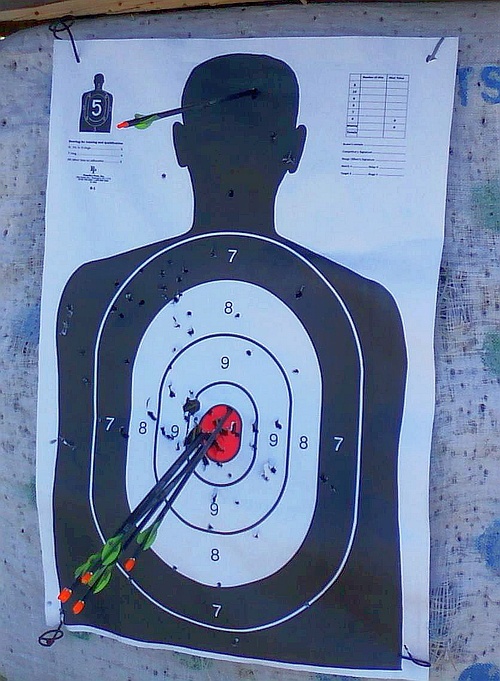
Below: I used to practice at a gun range not far from
my work, where they had a rudimentary archery range.
One day someone left a gun target at the archery
range, so I had a bit of fun with it! Poor shadow guy.
my work, where they had a rudimentary archery range.
One day someone left a gun target at the archery
range, so I had a bit of fun with it! Poor shadow guy.
-- About
-- Contact
-- Diesels
-- Links
entire website copyright Gregg Fuhriman
created with CoffeeCup Visual Site Designer
created with CoffeeCup Visual Site Designer
-- Layouts
-- Modules
-- Signalling