|
|


Model Photos using Helicon Focus
Helicon Focus, available here, is a photo processing software used to get sharp focus throughout the depth of field.
Here I briefly describe the process I use to create many of the model photos found on this site.
Helicon Focus, available here, is a photo processing software used to get sharp focus throughout the depth of field.
Here I briefly describe the process I use to create many of the model photos found on this site.
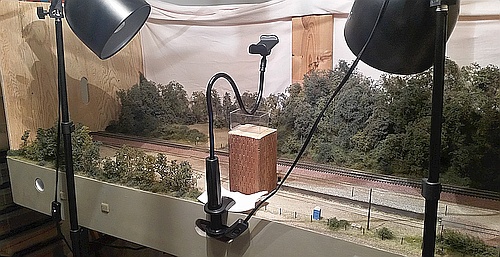
Left: A view of my basic photography setup. I use my Glen Frazer
module set as a diorama and backdrop - here, the Loading Ramp
section is shown while an intermodal flat car is photographed.
I set up color-neutral photo lights - two can be partially seen here
providing the main lighting, while a third is out of sight to the left
providing a backfill to reduce harsh shadows. These lights have
adjustable height so I can control the angle of light hitting the model
with respect to the camera.
I don't own a fancy camera - I just use my smart phone which is
adequate (though not ideal) for model photography. I set the phone
camera to maximum resolution to get the best quality images possible
(I'm sure I could get better shots with a "real" camera).
The smart phone is clamped in an adjustable "goose-neck" holder
(see below) so I can position it relative to the model. Here, the phone
is braced on a small clear box to ensure it remains steady and doesn't
move during the photo session. This is critical when using Helicon
Focus, as the software won't work if the camera moves during a photo
sequence. Same with the lights - don't move them mid-sequence.
The Helicon Focus software works by processing a sequence of
photos, called a "stack". Each image is focused progressively further
from the camera, so that in-focus "data" is collected through the entire
depth of field. To get this "photo stack", I use a free phone app called
Open Camera, which lets you set the parameters of the stack. Once
configured, it's just a once-touch operation to start the sequence.
More sophisticated "real" cameras have automated modes for doing
this "stack" trick with the push of a button.
Left: This setup is for taking "down-on" shots of the top of a model.
The goose-neck holder is shaped to place the phone camera up high
and over the track. It's stabilized using a small plastic box on top of a
wooden block. I just used items I found around the house for bracing
the goose-neck while avoiding damage to the module.
I also draped an old neutral-colored sheet as a poor-man's backdrop.
During photo processing I'll crop out things like the wooden supports.
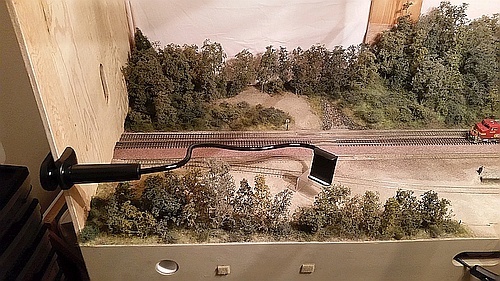
Left: This setup is for taking 3/4 view shots.
The goose-neck holder is clamped to a plywood endplate bolted
to the module end, carefully shaped to avoid the trees, and braced
on a small clear box resting on the dirt scenery.
The goose-neck has a spring-loaded clamp for holding the phone.
And that clamp has a ball joint connecting it to the bendable arm,
making it quite adjustable.
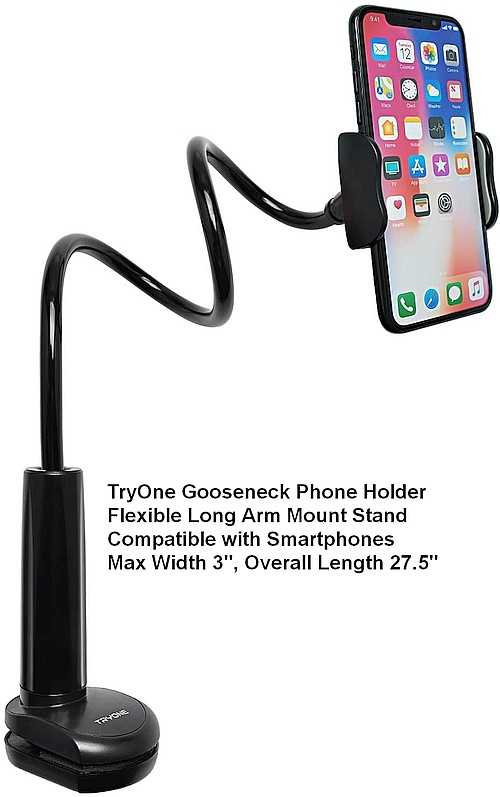
Left: This is the goose-neck holder I use - "TryOne" brand.
Once the photo "stack" is acquired, I download the images to my
computer and import them into the Helicon Focus software. I always
do a quick check of my "stack" in the tool before taking down my photo
setup, just in case I need to re-shoot the images (e.g., the phone
moved during shooting without my noticing).
The tool has three methods for processing a stack, each with an
assortment of settings and adjustments. Personally I use "method A
(weighted average)" with the "radius" set to 4 and "smoothing" set to 2.
Feel free to play around with things, there's really no risk and it's
interesting to see how the settings affect things.
Once I have a good resulting image I save it and then do further work
in a different photo editing tool (minor rotational fixes, color corrections,
cropping, resizing, etc.). Use whatever tool is your go-to for all that.
-- About
-- Contact
-- Diesels
-- Links
entire website copyright Gregg Fuhriman
created with CoffeeCup Visual Site Designer
created with CoffeeCup Visual Site Designer
-- Layouts
-- Modules
-- Signalling